발단
Google Search Console을 이용하여 색인 데이터를 추가 / 삭제하는 API를 사용하기 위해 간단히 Local에서 테스트해보려 합니다.
developers.google.com/search/apis/indexing-api/v3/quickstart
Indexing API 빠른 시작 | Google Developers
페이지가 추가되거나 삭제된 경우 Google에 알리기
developers.google.com
사용 가이드를 읽고 PostMan을 사용하여 API 를 보내 보니 401 이 반환되었습니다.
{
    "error": {
        "code": 401,
        "message": "Request is missing required authentication credential. Expected OAuth 2 access token, login cookie or other valid authentication credential. See https://developers.google.com/identity/sign-in/web/devconsole-project.",
        "status": "UNAUTHENTICATED"
    }
}
message를 읽어보니 OAuth 2를 필수적으로 이용해야 API를 테스트할 수 있다고 합니다.
Google OAuth 2 인증을 Local에서 진행하는 과정이 생각보다 복잡해서 나중에 이용하기 위해 정리해봅니다.
Google OAuth 2
우선 위 에러 메시지에서 전달된 페이지는 Google OAuth 2 인증을 할 수 있는 버튼을 프로젝트에서 사용하는 법에 대해 안내하고 있습니다.
developers.google.com/identity/sign-in/web/devconsole-project
Integrating Google Sign-In into your web app
Google Sign-In manages the OAuth 2.0 flow and token lifecycle, simplifying your integration with Google APIs. A user always has the option to revoke access to an application at any time. This document describes how to complete a basic Google Sign-In integr
developers.google.com
위 가이드 내용 중 Requesting additional permissions에 대한 가이드 페이지가 있습니다.
developers.google.com/identity/sign-in/web/incremental-auth
Requesting additional permissions | Google Sign-In for Websites
When requesting user permission to access user data or other resources, you can request all scopes up-front in the initial request or request scopes only as needed, using incremental authorization. Using incremental authorization, your app initially reques
developers.google.com
바로 이 추가 권한 요청(Requesting additional permissions)이 Google API를 사용하기 위한 기본이 되는데요.
이 가이드에서 제공된 Google Platform Library를 사용하면 인증을 얻어 사용할 수 있습니다.
다만 위 내용에서 가이드된 내용을 보고 OAuth 구조에 대해 알고 있는 상태에서 사용하시는 분들은 쉽게 이해할 수 있었겠지만, 처음 사용해보는 입장에서 인증단계에서 어떤 과정을 거쳐야 하는지, API에서 어떻게 사용해야 하는지 등이 쉽게 이해되지 않았습니다.
OAuth 2.0에 대해 간략하게 알아본 내용을 우선 설명해 봅니다.
OAuth 2.0 — OAuth
OAuth 2.0 OAuth 2.0 is the industry-standard protocol for authorization. OAuth 2.0 focuses on client developer simplicity while providing specific authorization flows for web applications, desktop applications, mobile phones, and living room devices. This
oauth.net
OAuth 2.0 은 타사의 사이트에 대한 접근 권한을 얻고, 그 권한을 이용하여 개발할 수 있도록 도와주는 프레임워크입니다.
developers.google.com/identity/protocols/oauth2#4.-send-the-access-token-to-an-api.
Using OAuth 2.0 to Access Google APIs | Google Identity
Note: Use of Google's implementation of OAuth 2.0 is governed by the OAuth 2.0 Policies. Google APIs use the OAuth 2.0 protocol for authentication and authorization. Google supports common OAuth 2.0 scenarios such as those for web server, client-side, inst
developers.google.com
OAuth 2.0에 대한 설명은 여러 사이트에 충분히 설명되어 있습니다.

Google OAuth에서 이 OAuth 2.0을 어떻게 사용하는지 위 시나리오를 확인해보겠습니다.
1. Request token 요청을 리다이렉트로 전송 합니다.
2. User 는 google 에 로그인하고 구글 서버에게 scope 에 대한 권한을 허용합니다.
3. Google server 는 1. 에서 보낸 redirect_uri 로 Authorization code parameter 를 추가하여 리다이렉트 전송 합니다.
4. Exchange code for token 요청을 리다이렉트로 전송합니다. 이때 Google server 가 전송해준 Authorization code 와 client ID, client secret 을 함께 전송합니다.
5. Google server 는 요청에 응답으로 access token 을 반환합니다.
6. API header 의 Authorization 에 access token 값을 실어 전송하면 API 에 정상 응답을 받을 수 있습니다.
1. Request token 요청 보내기
accounts.google.com/o/oauth2/auth
첫 번째 단계는 사용자의 인증을 거친 후 Authorization code를 얻기 위해 Google servers에게 리다이렉트 요청을 보내는 단계입니다.
https://accounts.google.com/o/oauth2/auth?
  client_id=[Your Client ID]&
  redirect_uri=http://localhost:8080/redirectCode&
  scope=https://www.googleapis.com/auth/indexing&
  response_type=code
sample로 작성된 redirect url입니다.
위 url에 parameter로 몇 가지 주요 데이터가 담겨야 하는데요
- client id : 애플리케이션의 고유 ID
- redirect uri : 사용자의 확인이 완료되면 리다이렉트 되어 돌아올 uri
- scope : 구글 서버에 저장된 데이터 중 사용자의 어떤 정보에 접근할 것인가
redirect uri는 내가 원한 주소로 돌아오기 위한 데이터이니 입력이 가능하지만, client id와 scope는 조금 생소합니다.
이 두 가지 값을 알아내는 방법을 확인 해보겠습니다.
client ID 확인 방법
우선 Google Cloud Platform에서 project를 생성합니다.
console.developers.google.com/
Google Cloud Platform
하나의 계정으로 모든 Google 서비스를 Google Cloud Platform을 사용하려면 로그인하세요.
accounts.google.com
생성된 project로 접근하면 좌측 메뉴에 사용자 인증 정보라는 메뉴가 있습니다.
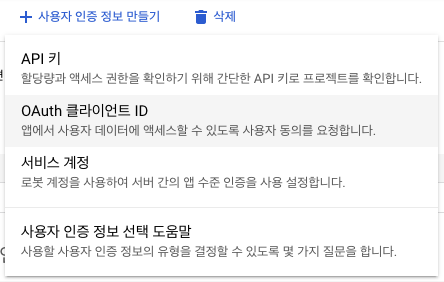
사용자 인증 정보 만들기 > OAuth 클라이언트 ID 생성을 차례로 눌러 OAuth 클라이언트 ID를 생성해 줍니다.

애플리케이션 유형은 웹 애플리케이션을 선택해줍니다.
애플리케이션의 이름을 입력해주고 만들기 버튼을 눌러 클라이언트 ID를 생성합니다.

생성이 완료되면 json 파일을 바로 다운로드하도록 해주는데요.
혹 다운로드가 실행되지 않았을 경우 위에 표시된 아이콘을 눌러 client 정보를 받을 수 있습니다.
다운로드한 json 파일을 확인하여 client_id를 알 수 있습니다.
Scope 확인 방법
생성된 project에 접근하여 좌측 메뉴를 확인하면 '라이브러리'라는 메뉴가 있습니다.

라이브러리 메뉴를 누르면 수많은 Google 서비스가 나타나는데요.
이 중 제가 사용할 indexing API를 검색해 예시로 보겠습니다.

검색된 Indexing API 를 들어가면 '사용' 버튼과 'API 사용해 보기' 버튼이 상단에 노출됩니다.
사용 버튼을 눌러 프로젝트에서 Indexing API에 접근할 수 있는 권한을 획득합니다.

그리고 'API 사용해 보기' 버튼을 누르면 새로운 페이지가 오픈되는데요.
좌측 메뉴의 getMetadata를 눌러보시면 페이지 최하단에 OAuth에서 사용할 수 있는 승인 범위에 대해 안내된 내용이 있습니다.

확인된 client id 와 scope를 추가한 주소로 redirect 시켜 google server에 요청을 보냅니다.
redirect 된 화면에서는 google 에 로그인을 진행하여, client에서 요청하는 서비스들의 정보에 접근할 수 있는 권한을 획득하는 절차를 거치게 됩니다.
이후 확인이 완료 되면 redirect_uri에 추가된 주소로 리다이렉트 되어 돌아오게 됩니다.
2. Exchange code for token 요청 보내기
www.googleapis.com/oauth2/v4/token
두 번째 단계는 access token 을 얻기 위해 Google servers에게 리다이렉트 요청을 보내는 단계입니다.
https://www.googleapis.com/oauth2/v4/token?
  code=[Authorization code]&
  client_id=[Your Client ID]&
  client_secret=[Your Client Secret]&
  redirect_uri=https://www.googleapis.com/auth/indexing&
  grant_type=authorization_code
sample로 작성된 redirect url입니다.
위 url에 parameter로 몇 가지 주요 데이터가 담겨야 하는데요.
- code : 리다이렉트에 전달된 Authorization code
- client_id : 애플리케이션의 고유 ID
- client_secret : 애플리케이션의 고유 Secret
- redirect_uri : Request token 요청에서 입력되었던 redirect_uri (변경 시 인증 오류 발생)
두 번째 요청에 필요한 값들을 얻는 방법에 대해 간략히 설명하겠습니다.
code
Request token 요청에서 받은 redirect uri로 리다이렉트를 시킬 때 url의 parameter 형태로 Authorization code를 전달해줍니다. redirect 된 url을 보면? code=부터 시작되는 Authorization code를 확인할 수 있습니다.
client_id / client_secret
Request token 요청에서 소개한 방법과 동일합니다.
확인된 값을 추가한 주소로 redirect 시켜 google server에 요청을 보냅니다.
응답 예시 :
{
  access_token: "Sample access token",
  expires_in: 3599,
  refresh_token: "Sample refresh token",
  scope: "https://www.googleapis.com/auth/indexing",
  token_type: "Bearer"
}
Google API를 사용하기 위한 access_token 을 받았습니다.
이제 API 를 보낼 때 header에 Authorization를 추가하여 전달받은 access_token을 추가하면 Google API 가 정상 동작하는 모습을 확인할 수 있습니다.
Local에서 Google API Header 에 넣을 Authorization 을 얻는 코드
1/2 과정을 압축하면 결국 Google Server에 보내기 위한 redirect url을 두 번 만들어서 보내는 것입니다.
이를 Local에서 확인하기 번거로워 간단하게 샘플을 작성해 보았습니다.
두 개의 화면으로 구성되어 있고, 입력 폼에 몇 가지 정보를 추가하면 access_token을 받을 수 있습니다.
index.html과receiveCode.html 에서 동작하는 코드는 그저 Input에 입력된 정보를 바탕으로 redirect 주소를 생성해주는 것뿐입니다.
사용 방법은 index.html , receiveCode.html을 생성한 후 localhost 8080 port로 실행하시면 됩니다.
승인된 리디렉션 URI
승인된 리디렉션 URI 는 redirect_uri 를 보내는 주소중 Google server 에서 허용할 수 있는 리디렉션의 목록입니다.
console.developers.google.com/
Google Cloud Platform
하나의 계정으로 모든 Google 서비스를 Google Cloud Platform을 사용하려면 로그인하세요.
accounts.google.com
생성한 프로젝트의 사용자 인증 정보 > OAuth 2.0 클라이언트 ID 를 보시면 아까 생성한 아이디가 목록에 있습니다.
목록을 클릭하여 진입하면 생성시에도 노출되었던 승인된 리디렉션 URI 메뉴가 있습니다.

이번 테스트에서는 8080 포트에 띄운 LocalHost 의 receiveCode.html 로 리다이렉트 시키도록 Request token 요청을 보낼 것입니다.
http://localhost:8080/receiveCode.html 를 추가합니다.
1. Request token 요청 보내기

index.html 에서는 client id 와 scope 를 추가해주시면 됩니다.
<html>
  <head>
    <style>
      input{
        width:500px;
      }
    </style>
  </head>
  <body>
    <form>
      <p>client id : <input id='clientId' onkeyup='printUrl()' /></p>
      <p>redirect uri : <input id='redirectUri' onkeyup='printUrl()' value="http://localhost:8080/receiveCode.html" /></p>
      <p>scope : <input id='scope' onkeyup='printUrl()' placeholder="여러개의 scope 를 입력할 때는 공백(space)으로 구분하여 입력합니다." /></p>
      <p>response type : <input id='responseType' onkeyup='printUrl()' value='code' /></p>
      <p>access type : <select name="job" id="accessType">
        <option value="online">online</option>
        <option value="offline" selected>offline</option>
      </select></p>
    </form>


    <div>Google OAuth 2 요청 경로 : <span id="result"></span></div>

    <div style="margin-top: 15px;">
      <button id="submitButton">요청하기</button>
    </div>
  </body>
  <script>
    function getEncodeString(string) {
      if (!string || typeof string !== 'string') return '';
      return encodeURIComponent(string);
    };

    function getUrl() {
      const googleOAuthUrl = 'https://accounts.google.com/o/oauth2/auth?';
      const params = {
        clientId: document.getElementById('clientId').value,
        redirectUri: getEncodeString(document.getElementById('redirectUri').value),
        scope: getEncodeString(document.getElementById('scope').value),
        responseType: document.getElementById('responseType').value,
        accessType: document.getElementById('accessType').value,
      }
      return `${googleOAuthUrl}client_id=${params.clientId}&redirect_uri=${params.redirectUri}&scope=${params.scope}&response_type=${params.responseType}&access_type=${params.accessType}`;
    };

    function printUrl() {
      const url = getUrl();
      document.getElementById("result").innerText = url;
    };

    function filledInText() {
      return !(
        !document.getElementById('clientId').value ||
        !document.getElementById('redirectUri').value ||
        !document.getElementById('scope').value ||
        !document.getElementById('responseType').value
      );
    };

    function onClickSubmit() {
      if (!filledInText()) {
        document.getElementById("result").innerText = `input field 를 모두 입력해 주세요`;
        return;
      }
      window.location.href = getUrl();
    };

    document.getElementById("submitButton").onclick = onClickSubmit;
  </script>
</html>
2. Exchange code for token 요청 보내기

receiveCode.html 에서는 전달받은 Authorization code를 자동으로 추가합니다.
client_id와 client_secret을 입력해주고 제출하면 access_token을 바로 확인하실 수 있습니다.
<!DOCTYPE html>
<html>
  <body>
      <a href="index.html">Google 에 권한 허용 하러 가기</a>
      <form action="https://www.googleapis.com/oauth2/v4/token" method="post" enctype="application/x-www-form-urlencoded">
        <p>code : <input type="text" name="code" id="code"></p>
        <p>client_id : <input type="text" name="client_id" id="clientId"></p>
        <p>client_secret : <input type="text" name="client_secret" id="clientSecret"></p>
        <p>redirect_uri : <input type="text" name="redirect_uri" id="redirectUri" value="http://localhost:8080/receiveCode.html"></p>
        <p>grant_type : <input type="text" name="grant_type" id="grantType" value="authorization_code"></p>
        <p><input type="submit">
      </form>

  </body>
  <script>
    function getParams(){
      const url = document.location.href;
      const queryStringArray = url.substring(url.indexOf('?') + 1).split('&');
      const result = {};
      queryStringArray.forEach((qs) => {
        qs = qs.split('=');
          result[qs[0]] = decodeURIComponent(qs[1]);
      });
      return result;
    };

    function fillCode() {
      const params = getParams();
      document.getElementById('code').value = params.code;
    };

    window.addEventListener("load", fillCode);
  </script>
</html>